So, I took an extended vacation from blogging, I started a YouTube channel, took a semester of classes, and my boyfriend took off to Japan. So, that’s basically where I’m at and I really have no excuse other than the fact that I really didn’t think anyone was reading this. I have gotten a few positive comments lately so I will probably do some posting. I enjoy creating content and I have a new camera that I want to take pictures with and this seems like a good way to screw around with both of those things. How about a review of Simplicity 8123? Its a Mimi G dress that I just made, I can do an in depth review that goes along with the video I made of it. I will post a link to that video so you can have a look for now…
Finally! Vogue 9288 Cape


Its been a long road for this cape, but its finally done. I believe I showed you all the process of shaving down the shoulders and I told you that I tested it with a muslin in mid December. Well, My boyfriend came back from his work trip and that left us with about 11 days before he left for Japan. Oh, did I mention my boyfriend of almost 7 years is going to Japan to work for a year? Well, he is, so I quit sewing while he was home so we could spend some quality time together before he abandons me for that sweet, sweet expat life! The only time I touched my machine was to hem his work uniform pants.
Anyway, that is part of the reason it took so long, the other part is when I broke my machine right in the middle of it. My needle just fell out and in the process bent, then I couldn’t get any more needles to tighten. I took it to the shop for repairs, and they were able to fix it on the spot, but by then I had to go back to work. Nothing kills the sewjo like work.
None of that matters, its done and I have pics! Now, I didn’t get any outdoor pics because of #bombcyclone and the resulting unbearable temperatures in the wake of it. Would you believe that my weather app is so terrible that I had no idea this was even happening until after it was over? I thought we were only going to get an inch of snow…


So, its clearly got some drama to it, from the length to the color! There isn’t much to review here. It was incredibly simple to put together, I had no trouble with it at all. I struggled with the buttonholes and button placement a bit, but the only one who will ever notice or see that is me. It is unlined, so used bias binding to finish my seams. I made the bias tape from some scraps from my stash. I think it made for a very striking finish that you get to have little glimpses of!

Inside out view, I used shank buttons, so I backed them with tiny red buttons on the inside for stability.
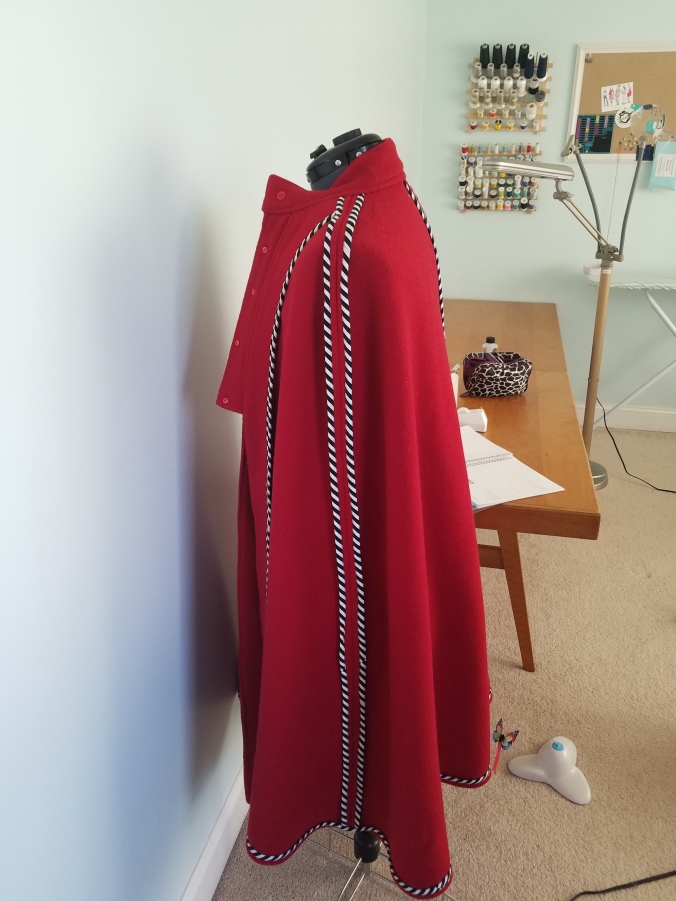
The only thing I would have done differently is to be more careful about my bias tape, I didn’t even think about matching the stripes on it, so in areas where they join, there are some mismatched stripes. I will consider being more thoughtful about that next time.
So, now that that is done, I have moved on to a few easy palate cleansers. I will be tackling McCalls 7660 and 7430. A loose sweater and a turtleneck dress that will be just a turtleneck for me. I got a few Christmas gifts and a couple of them were Closet Case Patterns. Morgan jeans and Sasha pants. I would like to get going on them soon, so hopefully they will be the next complicated thing on deck. But you guys know I like to change my mind. I also was feeling a little sorry for myself after my main squeeze left, so I got lost in some fabric sales and completely blew my January fabric budget out of the water. I was out of control. I have no regrets.
Until next time, happy sewing to all of you!
Horrific Joggers and a Promising Cape
I finished my joggers…
Well, sort of. I finished them as far as the situation would allow. I believe I mentioned that my fabric had absolutely no stretch and that I anticipated some problems with that. If I didn’t mention it, that is how I was feeling last weekend. I knew I had to fix the waistband gaping so I put them on and pinched out the excess at the center back seam. I measured the width of the excess and then serged it off the center back seam. I applied the measurement to the waistband and cut the back waistband in half and removed the excess minus the seam allowance. This gave me a perfect match between the waistband and the pants. So, everything went fine right?
Wrong. This is when the train started to derail. I must have made a mistake with my seam allowance when I attached the waistband to the pants. My elastic was too wide to shove into the waist! I decided to put that on hold and finish the stretchy cuffs at the bottom. Oh wait, my cuffs aren’t stretchy because I thought I was gonna power through and force the pattern to bend to my will. I was wrong, there was no way those cuffs were going on. I would not have been able to get my foot in the pants if I had put them on, so I have a situation on my hands. How much longer am I gonna screw around with these things before I give up and marinate in my own hubris? Long enough to thread a ribbon through the waist band and call it a deconstructed set of pj pants. Honestly my boyfriend took one look at them and said “What the hell is that?!” He said they were the ugliest thing he has ever seen. He wasn’t entirely wrong. Sadly, I do not have a picture of the finished product, but there isn’t much to see anyway. I will post some construction pics to show how I did the wedge, but that’s about all you’re getting out of me at this point. I have officially moved on.

Back significantly shorter waistband, please ignore my foot.
Folded in half to find center back and the notches were the width of the wedge so I used them as a guide for how much to remove.
I decided to get down to business on my Vogue cape. The pattern is Vogue 9288 and I will be making view B.


This will be my first time working with wool. Also my first time working with coating fabric. I found the beautiful red textures wool blend on Amazon. It is being sold there by Fabric.com and the price was really nice for a first try coat. I believe it was a little over ten dollars a yard and it looks nice so I am happy with it. It is thick, which makes me nervous about bulky seams, any suggestions or guidance toward tutorials about how to deal with bulk would be appreciated. I will also be making some bias binding for my seam finish on the inside because the cape is unlined.
I decided to make a muslin of the cape because I wanted to make sure of the fit, but more importantly I wanted to get some experience with the construction to make sure I was confident in my ability to figure out the instructions and also to see where I may have trouble with bulky seams. I am really glad I did because I did spot a few problem areas as far as fabric thickness goes, but more importantly the shoulder curve was a little to wide for my frame. I drew a ridiculously terrible line onto the fabric while I was wearing it which was difficult, but seemed to work despite how sloppy my “line” was. I will include a few pictures of the shoulder and the shitty line I drew and how I altered the pattern.


It turned out to be exactly 5/8″ which was cool because it took me down to the shoulder size of a small. It made marking the pattern tissue a little easier.


I was going to include a pic of the muslin as a whole, but for some reason I only have video of it. I cant seem to get the video to show up either, it keeps saying its corrupted. I made the muslin out of some old denim scraps which were the thickest thing I had that I was willing to sacrifice. I also should note that I did not make a muslin of the full length of the cape. I was only worried about the shoulder, bust and neck fit because those are the only places that are close to the body. I am satisfied with it and will be cutting out my wool as soon as I can get to it!
Thanksgiving Sewing Extravaganza!
I feel like I accomplished a lot of sewing even though I also accomplished a lot of laying around binge watching shows. I really enjoyed having all of my fabric cut out, ready and waiting for me to just sit down and sew it up. The only part about that prep that bothered me a little was that by the time I got to project number four (the sweatpants), I was wanting to switch gears a little. I really hate starting something and not finishing it. Finishing a project could mean deciding I hate it halfway through and stuffing it in my Rubbermaid of shame, but I would still mentally be finished with it. A cut out and untouched project that I just am not excited about is unfinished to me so I pushed forward with it, but it still needs work.
This is what I did finish…
McCall’s -This went really well, it sewed up easily, I added some width in the hip to allow me to close the cardigan. I didn’t do this very precisely, I just drew a 1 inch dot away from the notch at the hip and smoothed it out with my curved ruler. I also decided to leave off the button. The only other thing I did differently from the instruction was to coverstitch the hem and also the band that goes around the neckline. I can’t remember why I made that decision, but the stitches sink into the fabric on the outside and on the inside it looks a little cleaner. I used a shimmer knit that I got from Fabric Mart. It was a while ago, and I cant remember exactly what it was called. It has a shimmery gold coating on it that gave me anxiety every time I got the iron near it. My anxiety was all in vain, it didn’t hurt it at all, I just made sure to use the polyester setting and all was well. I wore this to Thanksgiving dinner at a friends house and I thought it looked very holiday/seasonally appropriate and it was very comfy. The only bone I have to pick is that the fabric makes noise when it moves, kinda like a crispy rustling sound. I still love it. The pics I took were after the fact and please ignore my turtleneck, I promise this is not how I styled this sweater when I wore it out!


McCall’s 7407 Top-This also turned out great, although the fabric had an unexpected effect where it looked like a grayish silver armor instead of black with silver sparkles. I’m cool with it, but it will be used in moderation because it is quite an eyeful. I would style it with more dressy pants not the light denim in the picture. I had no trouble with this pattern, it sewed up easily, required no alterations, and I was very happy with it. The next time I make it, I will probably scoop the neck a little bit because I prefer to show a little more skin there, and I could try to eliminate the center front seam, but now that I have thought a little more on that, I don’t think there is a fabric in the world that is wide enough for me to make that work. These pattern pieces were huge!


Sorry about the extreme face close up, no one but my boyfriend should be this close to my face, but I really needed you guys to know that I was not actually wearing pewter body armor, it is black and silver fabric! I swear it! See? See?!?!?!
Butterick 6427 Top-I was not happy with this, and I have no picture of it, although I do have a YouTube video up that shows me waving it around, I will insert that video I lieu of pics, you don’t have to watch the whole thing, the top makes its embarrassing appearance at the 4:45 minute mark. This make was always meant to be a lounge/pajama top, so its not too disappointing, but this was also meant to be a test run for a cool fabric that I got and I just didn’t feel like it would work for that. Also, for such a simple pattern, it would require a lot more fussing around to get it to work than I am interested in doing. There are tons of knit tops that require less work to get the same result. But… if I were to fix it to my liking, I would probably lengthen it significantly, as it stands right now its a crop top. The splits in the side seams go well above my bra line if I raise my arms up. So, it will be a nice lounging around the house top in the summer with all that side ventilation! The fabric is soft too, so that’s a plus. Also I screwed up the neckline. I should have practiced it first before I just went for it. It is a sad little V-neck that isn’t actually a V. I failed this shirt as much as it failed me.
Simplicity 2061 Joggers-I am technically still in work on these. While they are coming together ok, I am having a huge fit issue in the back waist booty area. I thought all of my problems would be caused by the complete lack of stretch in my sweatshirt fabric, but I was diligent about double checking the finished measurements to ensure I wouldn’t really need the stretch so that part is fine. Turns out that there isn’t enough elastic in the world to solve a 4 inch gap in the back, also I should have done something like a full seat adjustment because the fullness of my ass is causing the top of the pants to pull down in the back. I may take a wedge out (a huge wedge) and make them low rise all around. and refit the waistband to whatever size it ends up being, but I haven’t had the chance to get to them now that Thanksgiving is over. So pics to come when they are finished.
That is what I got up to on my holiday, how was yours? Is this a holiday that provides you with tons of free sewing time, or is this a holiday that leaves you with a boatload of extra shit to do and people to take care of? I am always curious about that stuff, so let me know!
Happy Thanksgiving!
Although I am sorry for the reason we Americans celebrate Thanksgiving day, I am always happy to bond with friends and family over a good meal. I am also thankful for a long sewing weekend! I have cut out 4 projects, all fairly simple (I hope). My goal is to have all four finished by Monday. So, I hope all of you out there have a wonderful holiday weekend, may it be filled with friends, family, food and some extra sewing time.
Unintentional Sewing Break
So guys, I haven’t posted for a while. The last thing I made was a pair of Ginger jeans from Closet Case Patterns. They turned out great as I expected them to, so that was good. I will get some pictures of them soon, I hand embroidered the pockets, tried my hand at some sashiko stitching, I am not sure if I did it right, but for my first try, I think it went well, there is only one little mistake that will only bother you OCD types!

My helper is not helping…

Rainbow Stitches!!!
I love the this pattern. The fit is really great for my body, I only have to grade from waist out one size to the hip, nothing else needs fixing. It is one of my very few TNT patterns and one of my most worn patterns. I don’t even struggle with the fly, but the waistband kills me every time. I manage to have to rip out stitches at least three times per waistband. Its got nothing to do with the pattern, its just me being an idiot and doing dumb things. This time, I didn’t quite catch it in the top stitching in a few parts. Now, I had already ripped out my top stitching once because it looked like shit, the second go round it was perfection… until I looked inside. Ugh, so I said fuck it and catch stitched it down by hand. Only time will tell if that was a good idea or not.
I finished those jeans on November 5th. It is now November 13th. I have sewed nothing in between! I haven’t even been in my sewing room, it is killing me!!!! Here’s the thing, I had about a million appointments scheduled the week after I finished and appointments during the afternoon when you work midnights are a special kind of hell. I had no time to do anything, and I get so wiped out when my schedule changes like that. I have to be very strict about my sleeping and waking times because its really easy to further disrupt your sleep cycle when it is already messed up from working through the night. But life has to happen right? So, I cram all my disruptions into one week and call the whole thing a loss and move on when its over and I can get back to normal.
Except that I couldn’t because my mom was coming out for a visit and I had to prepare for that the next week instead of doing some fun sewing stuff like I wanted to. But that’s ok, the sacrifice of my sewing time to make sure my mom has clean sheets and a sparkling toilet to use were worth it because I really enjoy spending time with her, even if she is a crazy person. She likes to sew too and she is my number one fan so its always nice to have that kind of a cheerleader around. One day I hope I can be the person she thinks I am.
At any rate, she is back home now and I have my time to myself again at least for this week. I already got some patterns prepped and hopefully I can get them cut out tomorrow before work. However, I am currently battling a pretty nasty chest cold so I am taking it as slowly as I need to. Hopefully I can at least throw some progress posts up, nothing too exciting, mostly loungewear test garments. If they fit nice and look cool, I may make them up in some “going out” type of fabrics.
Mcall’s 7538 Top Review
I am loving my new serger, and I want to make all of the knit things! I busted out this top because I already made the dress view in the summer and it worked out really nicely. I don’t think that dress has been on this blog, but I did do a review on Pattern Review for it.


I love the options to color block with this pattern. I went for view A, but did the color blocking from view C. I used a knit that is very similar in feel to the pink knit I used in my last review. I got this in one of the Fabric Mart mystery bundles and as usual, just like the pink one, it was very easy to sew and work with and the print is bold and graphic, I love it. I used a plain black ponte for the center panels, I was going for an optical illusion type of deal, it looks like a corset when I wear it!
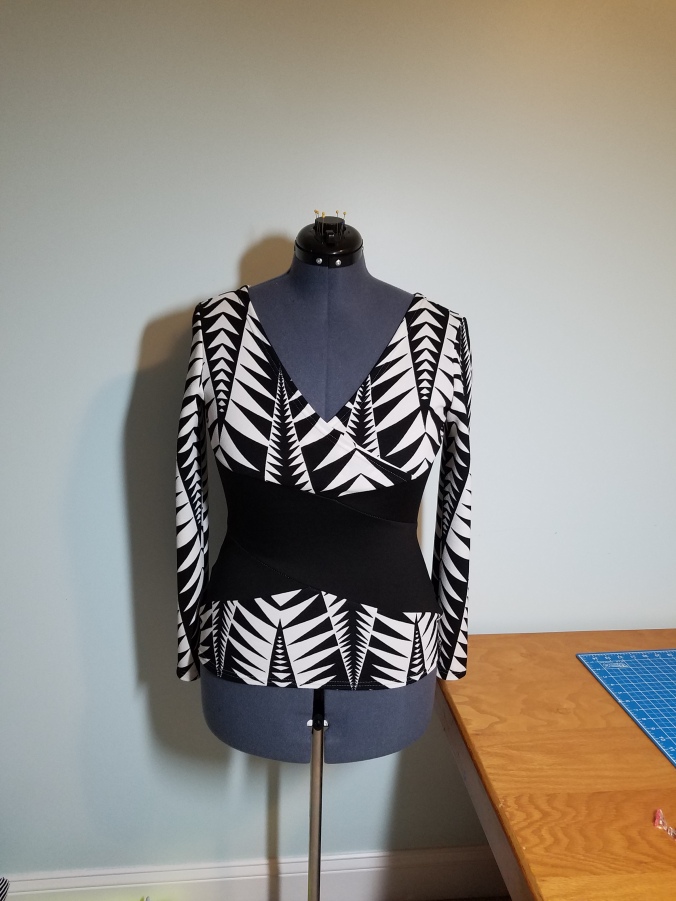
Front

Back… I think… they look exactly the same!

Side
I apologize for the lack of real live human pictures, but my camera man was sleeping and I did not go out anywhere fun enough to wear this top. We basically stayed in and watched Stranger Things in our PJs, which makes for a great weekend, but not great for showing off new tops. I will probably toss a video up with me wearing it soon.
I don’t know if you noticed in the pics, but it is very difficult to tell which side is the front and which is the back. I numbered the pieces on the back with washable marker when I cut them out so I know which is which right now, but I am glad I thought to sew a few red cross stitches in the neckline of the back so I know how to put it on after it comes out of the laundry!
Full disclaimer… any pattern matching or cool placement, or bad placement was unintentional, I didn’t bother with it at all.
I love how it turned out, I will say that its a little tight, and a little low cut, but that just means its a date night top, not a grocery store top, right?
Next up…
I already have a pair of Ginger Jeans cut out and waiting for me. I have been working on doing some rainbow colored sashiko stitching on the back pockets while I have down time at work. I have had some appointments this week that have filled up my free time so I haven’t been in my sewing room for a few days. Its killing me!!!!
What are you guys sewing up next?
A Little Video Accompaniment
I made a little video about some fabric I got myself for my birthday, as well as a few other rambles, check it out if you’d like. I had just woken up so once again, forgive the hair.
Redemption! Mcall’s 6996 Review
Finally a win. This is what I have been waiting for. I don’t want to say I owe it all to my new serger, but it certainly was useful and it got things done a lot faster and neater. I have been telling you of my failures for weeks now, and I felt like I was due for a win and I may have made things easy for myself by choosing a very simple to make pattern, I don’t think that’s cheating, I think its just what I needed. I decided on Mcall’s 6996, view D, size 12. I made no alterations although I probably should have, it still looks great, it just doesn’t look exactly like the pics on the pattern envelope.


This was pretty straight forward, nothing trick or complicated going on here. I used my serger for almost all of it. I used my regular machine to sew the stay tape into the ruching on the back of the neck band. The fabric was from Fabric Mart, it is a 100% poly jacquard knit, I took a close up of the texture. I don’t know if it really is a jacquard, it has a crepe like texture to it. But its bright and bold and graphic and ended up being perfect for a weekend wandering around DC in 60 degree weather. I didn’t end up using the belt although I did make it, I just didn’t wear it. Here are some pics before we took off on our trip.


When I make this again, and I will, I will probably use the pivot and slide method to add in some ease at the bust waist and hip. This fits perfect in the shoulders, but I really should have done my usual pattern alterations to get it to fit the way it does in the model pictures. However, I do like that this looks more like a loose jacket than a wrap up sweater. So, I am super happy with it, but if I make it again in a sweater knit, I will definitely want it to be more of a cozy look.
Looking at the pictures, I am thinking I may need to make a sway back adjustment. What do you guys think? This pooling is a common problem for me, although it is one I don’t notice until I see it in pictures. Is this a big deal or not?
Now since I made this, you all know that I couldn’t make it without at least one mistake in it right? So I took the pictures on my dress form to show you where it was. I am hoping its not as noticeable to everyone else as it is to me…


I don’t know how this happened, I think I wasn’t paying much attention or I am getting used to the differential feed on the serger or whatever. Its as close to perfect as I am going to get I think…
Oh well, on to the next project. I think I will stop saying what I am going to do since I seem to wreck everything I plan out.
Disappointment and Excitement
Where do I begin. I was working on a shirt, I believe I mentioned that in my last post which was some time ago. I started off good, took my time, made all my markings, cut carefully and all that. Then immediately cut a hole in the fabric on accident. I told you guys about that, but I pressed on! Got to the hidden button placket and that’s really when the wheels started to come off. I followed the instructions, checked, double checked and it just didn’t come out right. It was all wrong, but wrong in a way that I couldn’t figure out. I stared at this thing for hours trying to figure out where I had gone wrong. So I unpicked, started over and followed the instructions again. Same problem. There was no way that this was right. I don’t even know how to properly explain how I got there, unpicked again, abandoned the instructions and tried to do it how I thought it should go. I got a little closer, but now the actual placket was backward and the fly was ok. unpicked, and sewed it on the other way, much better, but still not going to work! I wish I had taken pictures of this mess, at this point I had unpicked it so many times that the fabric was falling apart. It was unsalvageable. This was my second fail in a row and I was feeling really shitty about it. I was low, real low. To top it off, it was my birthday when I finally gave up. So I did what any sad sewist would do….
(I would also like to apologize to anyone who was dying to see the end result. That should technically be no one, but just in case I have any secret fans!)
I went out and bought a serger! I feel so much better now! Fuck that shirt! I have a new Babylock Evolution to screw around with! I can screw up my clothes so much faster now! I am in love with it already. I can do a video on some of the features that I love about it if anyone cares to see it. Happy birthday to me!
The sad memories of my failed shirt are quickly fading away as I work on my new cardigan. Review of that will be up very soon because my fancy new machine is making quick work of it. I’m hoping to finish it tomorrow because I am going out of town this weekend. Its looking pretty cool already and I am very happy with how easy the serger is to use. I was up and running as soon as it was out of the box. I took an evening to play around with it to see what it could do and then got to work.

Not traditional sweater fabric, but I think it will look cool.
Also, I bought the serger from a store in Richmond, VA. I travel there once a month to do my drill weekends, so it was technically the most convenient place to get it since I am there often, although it is the farthest store away from me. Richmond also has a little tiny fabric store called Couture by LK Design. This is expensive stuff guys. I was feeling self indulgent so I made my way over after I bought the serger. I will post up another video of what I bought from there. They have things I have never seen before, it truly is an amazing little gem. If anyone is ever in the area, I highly recommend popping in to have a look.
